در این مطلب قصد داریم با اضافه کردن swipe ( کشیدن و رها کردن ) عملیات هایی مانند حذف و undo را به اپلیکیشن جی میل به recyclerview اضافه کنیم. با ما همراه باشید تا در این آموزش RecyclerView با ساخت یک پروژه ی جدید، این روند را بهتر درک کنید.
RecyclerView Swipe ( کشیدن و رها کردن ) چطور کار می کند؟ با ItemTouchHelper
به کمک کلاس ItemTouchHelper شما می توانید یک swipe را به recycler view اضافه کرده و سپس عملیات کشیدن و رها کردن را در پیاده سازی کنید . swipe کردن سطر، باعث میشود تا سطر از recyclerview حذف شود اما داده های موجود را بروزرسانی نمی کند. شما می توانید یک سطر خالی که با swipe کردن یک سطر نمایش داده میشود را مشاهده کنید. لازم به ذکر است که باید حواستان به بروز رسانی لیست حذف شده ی آیتم ها با پاک شدن از آداپتور مجموعه داده باشد.
ItemTouchHelper.SimpleCallback نوعی روش فراخوانی مانند onmove() ،onswipe و ()onchilddraw برای زمانی می باشد که سطر swipe میشود. نمایش پس زمینه، حذف کردن آیتم ها از آداپتور می توانند با استفاده از متدهای فراخوانی انجام شوند.
در قطعه کد زیر ItemTouchHelper برداشته و به recyclerview اضافه میشود. این کد باید کمی تغییر داده شود تا swipe و undo به درستی انجام شوند.
RecyclerView recyclerView = findViewById(R.id.recycler_view);

ItemTouchHelper.SimpleCallback itemTouchHelperCallback = new ItemTouchHelper.SimpleCallback(0, ItemTouchHelper.LEFT) {
    @Override
        public boolean onMove(RecyclerView recyclerView, RecyclerView.ViewHolder viewHolder, RecyclerView.ViewHolder target) {
        return false;
    }

    @Override
    public void onSwiped(RecyclerView.ViewHolder viewHolder, int direction) {
        // Row is swiped from recycler view
        // remove it from adapter
    }

    @Override
        public void onChildDraw(Canvas c, RecyclerView recyclerView, RecyclerView.ViewHolder viewHolder, float dX, float dY, int actionState, boolean isCurrentlyActive) {
            // view the background view
        }
    };

// attaching the touch helper to recycler view
new ItemTouchHelper(itemTouchHelperCallback).attachToRecyclerView(recyclerView);
تعریف جهت دهی های swipe
جهت دهی های swipe می توانند برای ایجاد ()simplecallback تصمیم گیری کنند. در این مقاله ما از جهت دهی های چپ به راست استفاده می کنیم. برای استفاده از سایر جهت دهی ها، باید با اپراتور | ترکیب کنید. با دستور زیر جهت های چپ، راست، بالا و پایین را تعریف می کنیم.
new ItemTouchHelper.SimpleCallback(0, ItemTouchHelper.LEFT | ItemTouchHelper.RIGHT)
طراحی لایه ها
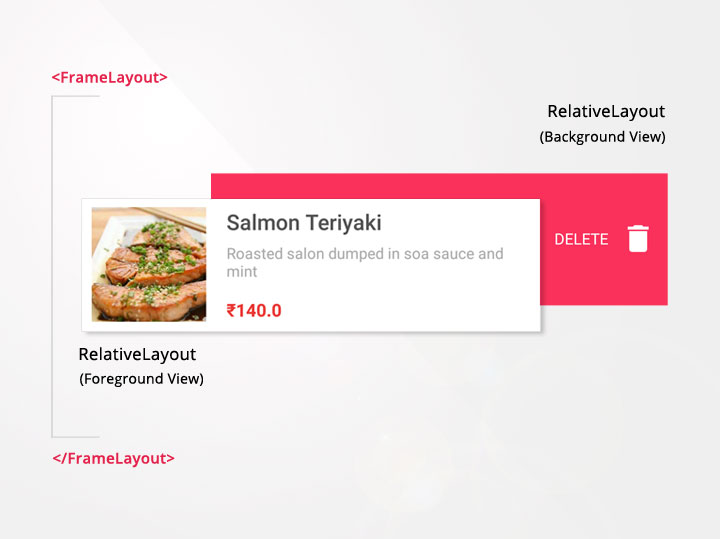
طرح بندی لایه ها برای اضافه کردن پس زمینه ی ردیف ها اهمیت زیادی دارد. بسیاری از افراد پس زمینه را روی یک بوم یا canvas با متد ()onChildDraw ایجاد می کنند. البته اگر پس زمینه کمی پیچیده باشد، این فرآیند بسیار خسته کننده خواهد شد. طراحی آن با لایه های xml خیلی ساده تر می باشد، بنابراین پس زمینه و پیش زمینه را با روش ساده و با کمک framelayout مشخص می کنیم و لایه ی پیش زمینه را در بالا قرار می دهیم.
پیش زمینه معمولا در recyclerview قابل مشاهده می باشد و زمانیکه swipe بر روی پس زمینه انجام میشود، در یک موقعیت ثابت قابل مشاهده خواهد بود.
مثال JSON، منوی رستوران
در این قسمت یک مثال JSON که شامل منوی رستوران و تصویر مناسب و نام می باشد را ارائه می دهیم. در این مثال قصد داریم تا این JSON را استفاده کنیم تا آیتم های غذا در لیست recyclerview نمایش داده شوند.
https://api.androidhive.info/json/menu.json
ایجاد پروژه جدید
برای ادامه ی کار در این آموزش RecyclerView نیاز به اطلاعات کافی در مورد ItemTouchHelper داریم تا یک پروژه ی جدید را شروع کنیم و خروجی مورد نظرمان را بدست آوریم.
۱- یک پروژه ی جدید در اندروید استودیو را از مسیر file/new project ایجاد و در نهایت basic activity را به عنوان قالب انتخاب کنید.
۲- bulid.gradle را که زیر پوشه ی app قرار دارد باز نموده و وابستگی های volley و recyclerview را اضافه کنید.
build.gradle
dependencies {
    implementation 'com.android.support:recyclerview-v7:26.1.0'

    // glide image library
    implementation 'com.github.bumptech.glide:glide:3.7.0'

    // volley http library
    implementation 'com.android.volley:volley:1.0.0'
    implementation 'com.google.code.gson:gson:2.6.2'
}
۳- منابع زیر را به strings.xml و dimens.xml و colors.xml اضافه کنید.
strings.xml
<resources>
    <string name="app_name">Recycler Swipe</string>
    <string name="action_settings">Settings</string>
    <string name="my_cart">My Cart</string>
    <string name="delete">DELETE</string>
</resources>
dimens.xml
<resources>
    <dimen name="activity_padding_horizontal">16dp</dimen>
    <dimen name="padd_10">10dp</dimen>
    <dimen name="ic_delete">30dp</dimen>
    <dimen name="thumbnail">90dp</dimen>
</resources>
colors.xml
<?xml version="1.0" encoding="utf-8"?>
<resources>
    <color name="colorPrimary">#111</color>
    <color name="colorPrimaryDark">#FFF</color>
    <color name="colorAccent">#ea3732</color>
    <color name="bg_row_background">#fa315b</color>
    <color name="item_name">#535353</color>
    <color name="description">#a9a9a9</color>
</resources>
۴- styles.xml را باز کنید و به زیر استایل ها اضافه کنید تا تم lighter به پروژه تان اضافه شود. این کار باعث میشود تا متن تیره تر از پیش زمینه ی سفیدی که در تولبار داریم به نظر برسد.
styles.xml
<resources>

    <!-- Base application theme. -->
    <style name="AppTheme" parent="Theme.AppCompat.Light">
        <!-- Customize your theme here. -->
        <item name="colorPrimary">@color/colorPrimary</item>
        <item name="colorPrimaryDark">@color/colorPrimaryDark</item>
        <item name="colorAccent">@color/colorAccent</item>
    </style>

    <style name="AppTheme.NoActionBar">
        <item name="windowActionBar">false</item>
        <item name="windowNoTitle">true</item>
    </style>

    <style name="AppTheme.AppBarOverlay" parent="ThemeOverlay.AppCompat.Light" />

    <style name="AppTheme.PopupOverlay" parent="ThemeOverlay.AppCompat.Light" />

</resources>
۵- یک کلاس به نام MyApplication.java ایجاد کنید و آنرا از applications گسترش دهید (extend). این یک کلاس تک هست که برای ایجاد کتابخانه ی volley به کار میرود.
MyApplication.java
import android.app.Application;
import android.text.TextUtils;

import com.android.volley.Request;
import com.android.volley.RequestQueue;
import com.android.volley.toolbox.Volley;

public class MyApplication extends Application {

    public static final String TAG = MyApplication.class
            .getSimpleName();

    private RequestQueue mRequestQueue;

    private static MyApplication mInstance;

    @Override
    public void onCreate() {
        super.onCreate();
        mInstance = this;
    }

    public static synchronized MyApplication getInstance() {
        return mInstance;
    }

    public RequestQueue getRequestQueue() {
        if (mRequestQueue == null) {
            mRequestQueue = Volley.newRequestQueue(getApplicationContext());
        }

        return mRequestQueue;
    }

    public <T> void addToRequestQueue(Request<T> req, String tag) {
        // set the default tag if tag is empty
        req.setTag(TextUtils.isEmpty(tag) ? TAG : tag);
        getRequestQueue().add(req);
    }

    public <T> void addToRequestQueue(Request<T> req) {
        req.setTag(TAG);
        getRequestQueue().add(req);
    }

    public void cancelPendingRequests(Object tag) {
        if (mRequestQueue != null) {
            mRequestQueue.cancelAll(tag);
        }
    }
}
۶- کلاس AndroidManifest.xml را باز کنید و کلاس MyApplication را به گره application اضافه کنید.مجوزهای internet را درست مانند زمانی که http را فراخوانی می کنیم اضافه کنید.
AndroidManifest.xml
<?xml version="1.0" encoding="utf-8"?>
<manifest xmlns:android="http://schemas.android.com/apk/res/android"
    package="info.androidhive.recyclerviewswipe">

    <uses-permission android:name="android.permission.INTERNET" />

    <application
        android:name=".MyApplication"
        android:allowBackup="true"
        android:icon="@mipmap/ic_launcher"
        android:label="@string/app_name"
        android:roundIcon="@mipmap/ic_launcher_round"
        android:supportsRtl="true"
        android:theme="@style/AppTheme">
        <activity
            android:name=".MainActivity"
            android:label="@string/app_name"
            android:theme="@style/AppTheme.NoActionBar">
            <intent-filter>
                <action android:name="android.intent.action.MAIN" />

                <category android:name="android.intent.category.LAUNCHER" />
            </intent-filter>
        </activity>
    </application>

</manifest>
تا این مرحله از کار، منابع آماده هستند. حال باید recyclerview را اضافه کنیم و داده ها را با تجزیه و تحلیل جیسون خروجی بگیریم.
۷- فایل لایه ی MainActivity.java را باز کنید و recyclerview را اضافه نمایید. از قسمت my activity ما به دو فایل لایه ی activity_main.xml و content_main.xml نیاز داریم.
activity_main.xml
<?xml version="1.0" encoding="utf-8"?>
<android.support.design.widget.CoordinatorLayout xmlns:android="http://schemas.android.com/apk/res/android"
    xmlns:app="http://schemas.android.com/apk/res-auto"
    xmlns:tools="http://schemas.android.com/tools"
    android:id="@+id/coordinator_layout"
    android:layout_width="match_parent"
    android:layout_height="match_parent"
    tools:context="info.androidhive.recyclerviewswipe.MainActivity">

    <android.support.design.widget.AppBarLayout
        android:layout_width="match_parent"
        android:layout_height="wrap_content"
        android:theme="@style/AppTheme.AppBarOverlay">

        <android.support.v7.widget.Toolbar
            android:id="@+id/toolbar"
            android:layout_width="match_parent"
            android:layout_height="?attr/actionBarSize"
            android:background="@android:color/white"
            app:popupTheme="@style/AppTheme.PopupOverlay" />

    </android.support.design.widget.AppBarLayout>

    <include layout="@layout/content_main" />

</android.support.design.widget.CoordinatorLayout>
content_main.xml
<?xml version="1.0" encoding="utf-8"?>
<android.support.constraint.ConstraintLayout xmlns:android="http://schemas.android.com/apk/res/android"
    xmlns:app="http://schemas.android.com/apk/res-auto"
    xmlns:tools="http://schemas.android.com/tools"
    android:layout_width="match_parent"
    android:layout_height="match_parent"
    app:layout_behavior="@string/appbar_scrolling_view_behavior"
    tools:context="info.androidhive.recyclerviewswipe.MainActivity"
    tools:showIn="@layout/activity_main">

    <android.support.v7.widget.RecyclerView
        android:id="@+id/recycler_view"
        android:layout_width="match_parent"
        android:layout_height="wrap_content"
        android:scrollbars="vertical" />

</android.support.constraint.ConstraintLayout>
۸-یک کلاس به نام Item.class ایجاد کنید و قطعه کد زیر را اضافه نمایید. کلاس POJO شامل آیتم های منو به نام های name، price، description و آدرس تصویر thumbnail می باشد.
Item.java
/**
 * Created by ravi on 26/09/17.
 */

public class Item {
    int id;
    String name;
    String description;
    double price;
    String thumbnail;

    public Item() {
    }

    public int getId() {
        return id;
    }

    public void setId(int id) {
        this.id = id;
    }

    public String getName() {
        return name;
    }

    public void setName(String name) {
        this.name = name;
    }

    public String getDescription() {
        return description;
    }

    public void setDescription(String description) {
        this.description = description;
    }

    public double getPrice() {
        return price;
    }

    public void setPrice(double price) {
        this.price = price;
    }

    public String getThumbnail() {
        return thumbnail;
    }

    public void setThumbnail(String thumbnail) {
        this.thumbnail = thumbnail;
    }
}
۹- یک لایه ی xml به نام cart_list_item.xml زیر res/layout ایجاد کنید. این لایه هر سطر در recyclerview را با کمک کلاس آداپتور خارج می کند. در اینجا ما یک imageview را برای thumbnail و چند textviews را برای نمایش آیتم name، description و price اضافه کرده ایم.
cart_list_item.xml
<?xml version="1.0" encoding="utf-8"?>
<FrameLayout xmlns:android="http://schemas.android.com/apk/res/android"
    android:layout_width="match_parent"
    android:layout_height="wrap_content"
    android:orientation="vertical">

    <RelativeLayout
        android:id="@+id/view_background"
        android:layout_width="match_parent"
        android:layout_height="match_parent"
        android:background="@color/bg_row_background">

        <ImageView
            android:id="@+id/delete_icon"
            android:layout_width="@dimen/ic_delete"
            android:layout_height="@dimen/ic_delete"
            android:layout_alignParentRight="true"
            android:layout_centerVertical="true"
            android:layout_marginRight="@dimen/padd_10"
            android:src="@drawable/ic_delete_white_24dp" />

        <TextView
            android:layout_width="wrap_content"
            android:layout_height="wrap_content"
            android:layout_centerVertical="true"
            android:layout_marginRight="@dimen/padd_10"
            android:layout_toLeftOf="@id/delete_icon"
            android:text="@string/delete"
            android:textColor="#fff"
            android:textSize="13dp" />

    </RelativeLayout>

    <RelativeLayout
        android:id="@+id/view_foreground"
        android:layout_width="match_parent"
        android:layout_height="wrap_content"
        android:background="@android:color/white"
        android:padding="@dimen/padd_10">

        <ImageView
            android:id="@+id/thumbnail"
            android:layout_width="@dimen/thumbnail"
            android:layout_height="@dimen/thumbnail"
            android:layout_marginRight="@dimen/activity_padding_horizontal"
            android:scaleType="centerCrop" />

        <TextView
            android:id="@+id/name"
            android:layout_width="wrap_content"
            android:layout_height="wrap_content"
            android:layout_toRightOf="@id/thumbnail"
            android:ellipsize="end"
            android:fontFamily="sans-serif-medium"
            android:maxLines="1"
            android:textColor="@color/item_name"
            android:textSize="17dp" />

        <TextView
            android:id="@+id/description"
            android:layout_width="wrap_content"
            android:layout_height="wrap_content"
            android:layout_below="@id/name"
            android:layout_marginTop="5dp"
            android:layout_toRightOf="@id/thumbnail"
            android:textColor="@color/description"
            android:textSize="12dp" />

        <TextView
            android:id="@+id/price"
            android:layout_width="wrap_content"
            android:layout_height="wrap_content"
            android:layout_alignParentBottom="true"
            android:layout_toRightOf="@id/thumbnail"
            android:textColor="@color/colorAccent"
            android:textStyle="bold" />

    </RelativeLayout>
</FrameLayout>
۱۰- یک کلاس به نام CartListAdapter.java را ایجاد کنید. این کلاس آداپتور برای پر کردن لایه ها با داده های مناسب در recyclerview استفاده میشود. ما همچنین دو متد اضافه برای کلاس removeItem() و restoreItem() اضافه کردیم تا عملیات حذف و اضافه کردن را به recyclerview انجام دهند.
CartListAdapter.java
import android.content.Context;
import android.support.v7.widget.RecyclerView;
import android.view.LayoutInflater;
import android.view.View;
import android.view.ViewGroup;
import android.widget.ImageView;
import android.widget.RelativeLayout;
import android.widget.TextView;

import com.bumptech.glide.Glide;

import java.util.List;

public class CartListAdapter extends RecyclerView.Adapter<CartListAdapter.MyViewHolder> {
    private Context context;
    private List<Item> cartList;

    public class MyViewHolder extends RecyclerView.ViewHolder {
        public TextView name, description, price;
        public ImageView thumbnail;
        public RelativeLayout viewBackground, viewForeground;

        public MyViewHolder(View view) {
            super(view);
            name = view.findViewById(R.id.name);
            description = view.findViewById(R.id.description);
            price = view.findViewById(R.id.price);
            thumbnail = view.findViewById(R.id.thumbnail);
            viewBackground = view.findViewById(R.id.view_background);
            viewForeground = view.findViewById(R.id.view_foreground);
        }
    }


    public CartListAdapter(Context context, List<Item> cartList) {
        this.context = context;
        this.cartList = cartList;
    }

    @Override
    public MyViewHolder onCreateViewHolder(ViewGroup parent, int viewType) {
        View itemView = LayoutInflater.from(parent.getContext())
                .inflate(R.layout.cart_list_item, parent, false);

        return new MyViewHolder(itemView);
    }

    @Override
    public void onBindViewHolder(MyViewHolder holder, final int position) {
        final Item item = cartList.get(position);
        holder.name.setText(item.getName());
        holder.description.setText(item.getDescription());
        holder.price.setText("₹" + item.getPrice());

        Glide.with(context)
                .load(item.getThumbnail())
                .into(holder.thumbnail);
    }

    @Override
    public int getItemCount() {
        return cartList.size();
    }

    public void removeItem(int position) {
        cartList.remove(position);
        // notify the item removed by position
        // to perform recycler view delete animations
        // NOTE: don't call notifyDataSetChanged()
        notifyItemRemoved(position);
    }

    public void restoreItem(Item item, int position) {
        cartList.add(position, item);
        // notify item added by position
        notifyItemInserted(position);
    }
}
۱۱- در این مرحله، قصد داریم یک توابع swipe را به recyclerview اضافه کنیم. برای این منظور یک کلاس به نام RecyclerItemTouchHelper.java ایجاد کرده و کلاس را از ItemTouchHelper.SimpleCallback گسترش داده و متدهای مورد نیاز را override می کنیم.
()getDefaultUIUtil با ItemTouchHelper استفاده میشود تا زمانیکه UI تغییر می کند، تشخیص داده شود. ما از این تابع برای حفظ پس زمینه در حالت و موقعیت استاتیک و انتقال پیش زمینه استفاده میکنیم.
در ()onChildDrawOver، موقعیت X از پیش زمینه در حالیکه کاربر swipe می کند، تغییر داده میشود
رابط RecyclerItemTouchHelperListener برای این استفاده میشود تا فراخوانی را برای اکتیویتی های پیاده سازی شده ارسال کند.
RecyclerItemTouchHelper.java
import android.graphics.Canvas;
import android.support.v7.widget.RecyclerView;
import android.support.v7.widget.helper.ItemTouchHelper;
import android.view.View;

/**
 * Created by ravi on 29/09/17.
 */

public class RecyclerItemTouchHelper extends ItemTouchHelper.SimpleCallback {
    private RecyclerItemTouchHelperListener listener;

    public RecyclerItemTouchHelper(int dragDirs, int swipeDirs, RecyclerItemTouchHelperListener listener) {
        super(dragDirs, swipeDirs);
        this.listener = listener;
    }

    @Override
    public boolean onMove(RecyclerView recyclerView, RecyclerView.ViewHolder viewHolder, RecyclerView.ViewHolder target) {
        return true;
    }

    @Override
    public void onSelectedChanged(RecyclerView.ViewHolder viewHolder, int actionState) {
        if (viewHolder != null) {
            final View foregroundView = ((CartListAdapter.MyViewHolder) viewHolder).viewForeground;

            getDefaultUIUtil().onSelected(foregroundView);
        }
    }

    @Override
    public void onChildDrawOver(Canvas c, RecyclerView recyclerView,
                                RecyclerView.ViewHolder viewHolder, float dX, float dY,
                                int actionState, boolean isCurrentlyActive) {
        final View foregroundView = ((CartListAdapter.MyViewHolder) viewHolder).viewForeground;
        getDefaultUIUtil().onDrawOver(c, recyclerView, foregroundView, dX, dY,
                actionState, isCurrentlyActive);
    }

    @Override
    public void clearView(RecyclerView recyclerView, RecyclerView.ViewHolder viewHolder) {
        final View foregroundView = ((CartListAdapter.MyViewHolder) viewHolder).viewForeground;
        getDefaultUIUtil().clearView(foregroundView);
    }

    @Override
    public void onChildDraw(Canvas c, RecyclerView recyclerView,
                            RecyclerView.ViewHolder viewHolder, float dX, float dY,
                            int actionState, boolean isCurrentlyActive) {
        final View foregroundView = ((CartListAdapter.MyViewHolder) viewHolder).viewForeground;

        getDefaultUIUtil().onDraw(c, recyclerView, foregroundView, dX, dY,
                actionState, isCurrentlyActive);
    }

    @Override
    public void onSwiped(RecyclerView.ViewHolder viewHolder, int direction) {
        listener.onSwiped(viewHolder, direction, viewHolder.getAdapterPosition());
    }

    @Override
    public int convertToAbsoluteDirection(int flags, int layoutDirection) {
        return super.convertToAbsoluteDirection(flags, layoutDirection);
    }

    public interface RecyclerItemTouchHelperListener {
        void onSwiped(RecyclerView.ViewHolder viewHolder, int direction, int position);
    }
}
۱۲- در نهایت، MainActivity.java را باز کنید و تغییرات را مانند زیر انجام دهید.
متد () prepareCart، جیسون را از url میگیرد و بعد از تجزیه و تحلیل، آیتم ها را به آداپتور لیست داده اضافه میکند.
RecyclerItemTouchHelper در اینجا ایجاد شده و به recyclerview اختصاص داده شده است. در اینجا تنها جهت چپ را تعریف کرده ایم.
متد onSwiped() زمانی فراخوانی میشود کهswipe ارائه شود. گام مهم در اینجا حذف آیتم های ردیف می باشد. mAdapter.removeItem برای حذف سطر از recyclerview فراخوانی میشود.
هنگامی که سطر حذف میشود، snackbar برای نمایش یک پیام با گزینه ی undo استفاده میشود. بالای کلیک undo، سطر دوباره با متد mAdapter.restoreItem() به حالت قبل برمیگردد.
متغیرهای deletedItem و deletedIndex برای ذخیره سازی موقت آیتم های حذف شده و ایندکس تا زمانیکه snackbar نمایش داده میشود، کاربرد دارد.
MainActivity.java
import android.graphics.Color;
import android.os.Bundle;
import android.support.design.widget.CoordinatorLayout;
import android.support.design.widget.Snackbar;
import android.support.v7.app.AppCompatActivity;
import android.support.v7.widget.DefaultItemAnimator;
import android.support.v7.widget.DividerItemDecoration;
import android.support.v7.widget.LinearLayoutManager;
import android.support.v7.widget.RecyclerView;
import android.support.v7.widget.Toolbar;
import android.support.v7.widget.helper.ItemTouchHelper;
import android.util.Log;
import android.view.Menu;
import android.view.View;
import android.widget.Toast;

import com.android.volley.Response;
import com.android.volley.VolleyError;
import com.android.volley.toolbox.JsonArrayRequest;
import com.google.gson.Gson;
import com.google.gson.reflect.TypeToken;

import org.json.JSONArray;

import java.util.ArrayList;
import java.util.List;

public class MainActivity extends AppCompatActivity implements RecyclerItemTouchHelper.RecyclerItemTouchHelperListener {

    private static final String TAG = MainActivity.class.getSimpleName();
    private RecyclerView recyclerView;
    private List<Item> cartList;
    private CartListAdapter mAdapter;
    private CoordinatorLayout coordinatorLayout;

    // url to fetch menu json
    private static final String URL = "https://api.androidhive.info/json/menu.json";

    @Override
    protected void onCreate(Bundle savedInstanceState) {
        super.onCreate(savedInstanceState);
        setContentView(R.layout.activity_main);
        Toolbar toolbar = findViewById(R.id.toolbar);
        setSupportActionBar(toolbar);
        getSupportActionBar().setTitle(getString(R.string.my_cart));
        getSupportActionBar().setDisplayHomeAsUpEnabled(true);

        recyclerView = findViewById(R.id.recycler_view);
        coordinatorLayout = findViewById(R.id.coordinator_layout);
        cartList = new ArrayList<>();
        mAdapter = new CartListAdapter(this, cartList);

        RecyclerView.LayoutManager mLayoutManager = new LinearLayoutManager(getApplicationContext());
        recyclerView.setLayoutManager(mLayoutManager);
        recyclerView.setItemAnimator(new DefaultItemAnimator());
        recyclerView.addItemDecoration(new DividerItemDecoration(this, DividerItemDecoration.VERTICAL));
        recyclerView.setAdapter(mAdapter);

        // adding item touch helper
        // only ItemTouchHelper.LEFT added to detect Right to Left swipe
        // if you want both Right -> Left and Left -> Right
        // add pass ItemTouchHelper.LEFT | ItemTouchHelper.RIGHT as param
        ItemTouchHelper.SimpleCallback itemTouchHelperCallback = new RecyclerItemTouchHelper(0, ItemTouchHelper.LEFT, this);
        new ItemTouchHelper(itemTouchHelperCallback).attachToRecyclerView(recyclerView);


        // making http call and fetching menu json
        prepareCart();
    }

    /**
     * method make volley network call and parses json
     */
    private void prepareCart() {
        JsonArrayRequest request = new JsonArrayRequest(URL,
                new Response.Listener<JSONArray>() {
                    @Override
                    public void onResponse(JSONArray response) {
                        if (response == null) {
                            Toast.makeText(getApplicationContext(), "Couldn't fetch the menu! Pleas try again.", Toast.LENGTH_LONG).show();
                            return;
                        }

                        List<Item> items = new Gson().fromJson(response.toString(), new TypeToken<List<Item>>() {
                        }.getType());

                        // adding items to cart list
                        cartList.clear();
                        cartList.addAll(items);

                        // refreshing recycler view
                        mAdapter.notifyDataSetChanged();
                    }
                }, new Response.ErrorListener() {
            @Override
            public void onErrorResponse(VolleyError error) {
                // error in getting json
                Log.d(TAG, "Error: " + error.getMessage());
                Toast.makeText(getApplicationContext(), "Error: " + error.getMessage(), Toast.LENGTH_SHORT).show();
            }
        });

        MyApplication.getInstance().addToRequestQueue(request);
    }

    /**
     * callback when recycler view is swiped
     * item will be removed on swiped
     * undo option will be provided in snackbar to restore the item
     */
    @Override
    public void onSwiped(RecyclerView.ViewHolder viewHolder, int direction, int position) {
        if (viewHolder instanceof CartListAdapter.MyViewHolder) {
            // get the removed item name to display it in snack bar
            String name = cartList.get(viewHolder.getAdapterPosition()).getName();

            // backup of removed item for undo purpose
            final Item deletedItem = cartList.get(viewHolder.getAdapterPosition());
            final int deletedIndex = viewHolder.getAdapterPosition();

            // remove the item from recycler view
            mAdapter.removeItem(viewHolder.getAdapterPosition());

            // showing snack bar with Undo option
            Snackbar snackbar = Snackbar
                    .make(coordinatorLayout, name + " removed from cart!", Snackbar.LENGTH_LONG);
            snackbar.setAction("UNDO", new View.OnClickListener() {
                @Override
                public void onClick(View view) {

                    // undo is selected, restore the deleted item
                    mAdapter.restoreItem(deletedItem, deletedIndex);
                }
            });
            snackbar.setActionTextColor(Color.YELLOW);
            snackbar.show();
        }
    }

    @Override
    public boolean onCreateOptionsMenu(Menu menu) {
        // Inflate the menu; this adds cartList to the action bar if it is present.
        getMenuInflater().inflate(R.menu.menu_main, menu);
        return true;
    }
}
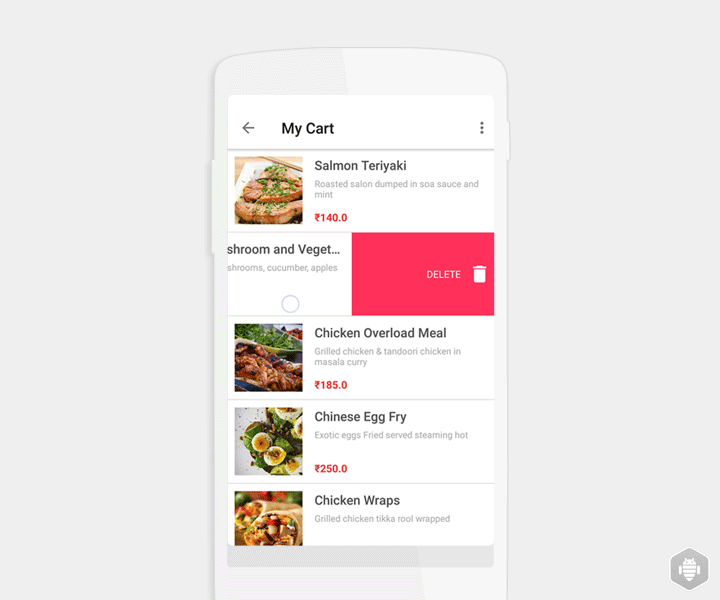
در نهایت برنامه را اجرا کنید و تست های لازم را انجام دهید. مطمئن شوید که دستگاه تلفن شما به اینترنت متصل است. خروجی برنامه را در تصویر زیر مشاهده می کنید.
آموزش RecyclerView
همچنین شما می توانید برای یادگیری تخصصی اپلیکیشن نویسی اندروید با شرکت کلاس های برنامه نویسی در مشهد و دوره آموزش اندروید مشهد به صورت حرفه ایی در این زمینه شروع به کار نمایید.
 آموزش برنامه نویسی در مشهد


